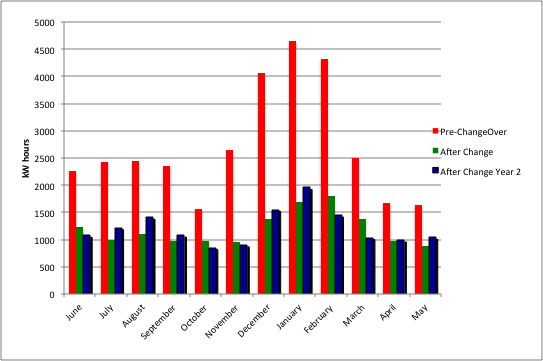
Total Monthly House Power Usage (kWhr): Red=Before Changes, Green=After Changes
My Energy Conservation Project
Last Update 25 June 2011
Location: Knoxville, TN
The purpose of this page is to give my experience with saving energy, to share my ideas and results in the hopes that others can benefit also.
Section One: Electric
The Bottom Line:
Total Monthly House Power Usage (kWhr): Red=Before Changes, Green=After Changes |
|
What Was Implemented and Costs: (In order of estimated effectiveness)
TOTAL COST = $26,750
Cost Reductions (Tax Credits Etc.)
TOTAL REDUCTIONS = $15,090
Final Costs and Years to Payoff:
Details of Implementation and Assessment:
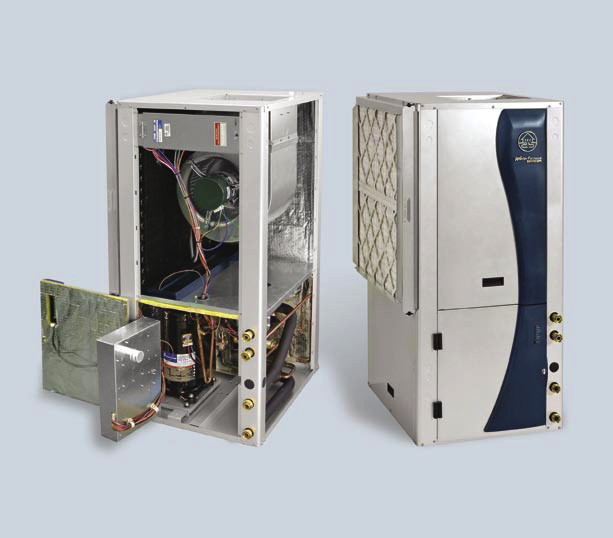
Geothermal Heat Pump with attached water heater pre heater (Cost = $21,000)
A single 3 ton capacity envision water furnace unit replaced 2 outside heatpumps (2 tons each) and 2 inside air handlers. This unit has a SEER (seasonal energy efficiency ratio) of 35 compared to our old units, which had SEERs of about 10 to 11. Our old units made extensive use of the resistive heating elements in the winter, which have a COP (coefficient of performance) of 1. In contrast, the water furnace has a COP of 5.
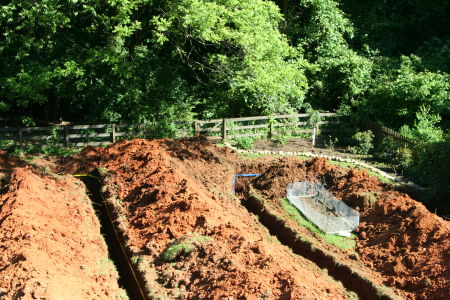
Geothermal heat pumps use a ground loop buried underground to take advantage of the fact that ground temperature 6 feet down remains relatively constant between 50 and 60 degrees. This allows cool to be drawn from the ground loop in the summer, and heat to be drawn from the ground loop in winter, making geothermal a much more efficient way to heat and cool your house. Our ground loop was laid in a six foot deep, 2 feet wide, and 400 foot long trench in our backyard.
During the process, our two systems were unified into a single system with 2 zones. This required the running of some extra heat and air ducts, and the loss of a little closet space. Our system was installed by Smith and Associates. We were very pleased with the install. Their quote was about 10% higher than others, but their reputation, experience, and the fact that they used the waterfurnace brand, made us decide that they were the best way to go. Link to their website: www.smithgeothermal.com
This unit also came with a water heater pre-heater, which during the summer preheats the water using the heat generated by the compressor during summer cooling, and using the efficient heat pump during the winter.
Extra Insulation around, and sealing of all attic heat and air ducts ($300)
Our heat and air system has ducts that run through our attic space. Upon inspection it was realized that several of these were a little loose at the vents, thus we were pumping heat and cool air directly into the attic space. These were thoroughly re-sealed, and we also had them wrap a second layer of reflective insulation around all of the exposed heat and air duct in the attic. Since we had them do this during the install, when they were in the attic anyway, the cost was low.
TED and Watt Killer Analysis to determine and remove phantom power losses (Cost = $270)
The Energy Detective (TED) is a device that allows you to monitor in real time, the total energy usage of your house. It requires a small install in your fuse box, then the display unit can be plugged into a normal outlet in your house. It will show you kWhr usage, or cost per hour usage. It will also track month to date usage, and predict your total monthly usage and energy bill.
The Watt Killer, is a small portable device (cost barong $35) that you can plug anything into your house into, and it will display the power usage.
Using these two devices, you can determine where you are using power that you really don't need to be using. I was able to remove 400-500 watts of constant usage from my house using this device. Some of the biggest culprits were the office equipment in my home office (shredder, printers, hard drives, computers, etc.), my attic fans, my pond pump, and the big screen TV. Some of these also have a "phantom" power draw even when not in use. By putting these items on power strips, and turning them off when not in use, I was able to reduce power usage considerably. I also discovered that my attic fans, and pond pump were using large amounts of power. I disconnected the attic fans, and replaced the pond pump with a lower wattage unit. Just these reductions probably amounted to about 300 kWhrs per month.
Additional attic insulation (8 additional inches) (Cost = $950)
8 inches of enviro insulation was added to attic, and the access door was replaced and insulated.
Compact Fluorescents replaced all incandescent bulbs (Cost = $105)
We put CF (compact fluorescent) bulbs in almost all locations in the house to replace the incandescent bulbs. Incandescent uses 60 watts per bulb, CFs use only about 13 watts for the same light output.
Draft sealing using blower door (Cost = $550)
They removed the front door, and put up a vinyl barrier which included a large electric fan. This fan pressurized the house, allowing them to go throughout the house and attic, and seal up any leaks with expanding foam.
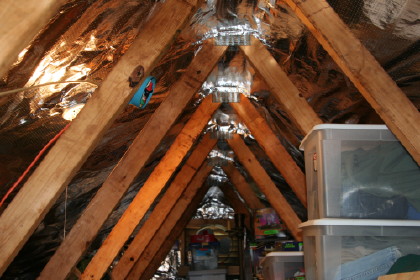
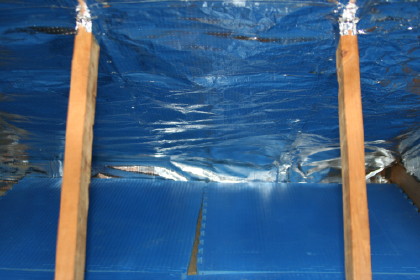
Radiant Barrier in Attic (Cost = $2,600)
A thin metal foil is stapled to the rafters creating a reflective barrier to reflect the heat from the roof back up to the roof, theoretically saving on cooling costs in the summer.
In our install they did not completely seal the rafter space at the crown of the gable or along the bottom at the eaves. So, the roof heat was heating the air in the joist space between the barrier and the roof, and that this heat is mostly just spilling back into the attic via convection through the large gap (6 to 8 inches) that was left at the crown and eaves. We installed the radiant barrier not only in the main attic, but also in the garage attic, in hopes of making being in the garage more bearable in the summer. After the initial installation, the situation in the garage was NOT improved. It was still MUCH hotter in the garage than the outside temperature, just as before. The attic space over the garage was being heated to a temperature of around 120 degrees (measured, not estimated) in the summer. You could feel the intense heat coming through the sheetrock finished garage ceiling, it was like standing in an oven. The finished ceiling of the garage was HOT to touch.
UPDATE: We have completely sealed the radiant barrier now, with a continuous seal from eaves to crown. All the gaps were covered with radiant barrier to form a continuous air space from eaves to crown, and all the seems were taped. It should be noted that we used a perforated radiant barrier, and left the gable vents uncovered, so hopefully moisture will not be an issue. So far, this seems to have GREATLY improved the performance of the radiant barrier. The garage is much cooler, cooler even than the outside temperature. We had a sunny day today (5 April 2010), the outside temperature is about 83 degrees, the inside garage temperature is about 73 degrees, and the attic temperature is about 92 degrees. The sheet rock ceiling inside the garage is cool to touch. This is a VERY LARGE improvement from the original install results, and I now consider the radiant barrier install a success! I will update this in the middle of the summer with more temperature results. Thanks to my friends Dennis Wright and Aaron Shugart Brown who helped me complete the radiant barrier seal.
UPDATE: During the installation of the new reflective shingles, I got an opportunity to have a look at the backside (the side facing the roof) of the radiant barrier in the main house attic space. I had been worried about this since they blew in the insulation after they installed the radiant barrier, which created a huge amount of dust. I was concerned that the dust might have settled on the backside of the radiant barrier which would greatly decrease or even totally eliminate its performance. This was indeed the case, a thick layer of insulation dust and debris covered the backside of the barrier. I will make temperature measurements and update this section soon. I will be able to compare the main roof space and garage space, and this should give a reasonable indication of the effect of the insulation dust on the radiant barrier in the main attic.
Note: These Pictures are after the final completion sealing in the attic space above the garage. After the initial install, there was a 6 to 8 inch open gap at the top and the bottom of the radiant barrier.
Repairs to walls and yard from geothermal installation (Cost = $1000)
Resurfacing of lawn and sheet rock repair.
Note: The draft sealing, attic insulation, TED installation and initial Radiant Barrier install were all done by Sustainable Future based in Knoxville. Nice guys who did good work. www.sustainablefuture.biz
Future Planned Improvements:
********************************************************************************
Section Two: Water
Bottom Line: My rough estimate based on past water usage is a 40% reduction. When all improvements are complete, I will do a better analysis.
Water Conserving Toilets.
Original Equipment and Research
We had 4 old style (3.5 gallons per flush) toilets. Also, they do not fluch well, often requiring a double flush for solids, and frequent cloging. This is very frustrating, so good flush power was a high priority for me in the search for new water saving toilets. After much research, I narrowed my selection down to 2 models. The American Standard Champion 4 (1.6 gal/flush), and the Caroma Sydney Smart 270 dual flush (1.2 or 0.8 gal/flush). Based on my research, it seemed that the Champion 4 was probably the better flusher. It had the highest MAP rating I could find. The MAP rating is a measure of how well a toilet flushes. There is very little negative about the Champion 4 online. The Sydney Smart on the other hand, had numerous warnings about "streaking" (residue streaks from a solids flush, think skid marks in underwear).
Real World Results:
I purchased one each of the Champion 4 and the Sydney Smart to compare them directly in the real world.
American Standard Champion 4
The Champion 4 went in first. The Champion uses a suction flush. The water pool in the toilet bowl is small. I found it to flush very well. However, if paper was dropped in the bowl, outside of the small pool of water, it tends to get left behind. And since there is not down wash on the sides of the bowl, even a second flush will not always get it to go. UPDATE: If you hold the lever down for a few seconds, you get some wash down, which solves the problem of the paper left behind. Based on results so far, I think clogging is a thing of the past. I am also not super happy with the appearance of this toilet, and the fact that it is only available in white at the home depot store. (No off white color available at the store, but you can get the off white on line, and I would imagine they would special order it for you at home depot as well). Also, the seat top is flimsy, it collapses if you sit on it. This was the "right height" model, taller than a standard toilet. I have heard many people rave about these, but I am 5' 10", and found it too be too tall, and a little uncomfortable. On the plus side, the advertised "everclean" surface seems to work well, little to no streaking has been observed so far. It was also cheaper by about $100 than the white Sydney Smart, and the Champion was also available at home depot, so I could just go pick it up. I paid about $250 total, including tax.
Caroma Sydney Smart 270 Dual Flush
The Sydney Smart went in next. The Sydney Smart uses a wash down flush. WOW, that flush is really impressive. No worries about leaving paper behind, because ALL of the water comes down the sides. I can't imagine this thing ever clogging, and I have tested it with some pretty difficult tasks. It is a much better looking toilet than the Champion 4, and it is available in biscuit (off white). The biscuit color adds about $40 to the price. It uses much less water then the Champion, using only 1.2 gallons per flush for solids, and only 0.8 gallons per flush for liquids. The seat is also better, it does not collapse if you sit on the seat top. And, I got the soft close top, and it is really cool, you just tilt it down a little, and it closes in slow motion. I found this toilet online at www.plumbingmall.com. The white version is $340 with free shipping. Customer service was awesome also, as I initially placed my order for white, then called back the next day to change it to biscuit. The toilet was already in the waiting area to be picked up by UPS, and the guy actually went out there and pulled it, and replaced it with the other toilet, and it still shipped out that day. So, it only took 3 days for my toilet to get to me with free shipping. Awesome! The only downside is that the streaking (solid waste streaks) problem is real, as I noticed on my very first solids flush. It is worse than other toilets I have seen. But in all other regards, I find it the Caroma superior to the Champion 4. UPDATE: We replaced our remaining two standard toilets with Caromas also, so we have 3 Caromas and one Champion.
Low Flow Faucet Aerators.
Standard faucet aerators are rated at 2.2 gallons per minute (GPM). Water saving models range from 0.5 to 1.5 gallons per minute. Since I had no idea what these flow rates would be like, I ordered several different flow rates. The 0.5 GMP ones give out a pitiful stream of water, not enough to even wash your hands thourougly. I don't recommend these. However, the 1 GPM model puts out a great flow. I changed all ours over to either 1.0 or 1.5 GMP. I left the kitchen sink at 2.2 GPM, because you need higher water flow there. These guys are cheap, and you just screw out the old one at the end of the faucet, and screw in the new one. It is super easy. Almost all of them will work with either inside or outside threads, and the thread sizes are standard, so you don't have to worry about matching them. I liked the ones from New resources group, and I ordered these from amazon.com.
Low Flow Showerheads.
Older showerheads can use more than 5 GPM. The new standard is 2.5 GPM, and all of our showers had the 2.5s prior to the energy update. These 2.5s provide a very nice powerful shower. I installed a 1.6 GPM version in one of our bathrooms, and it gives a nice shower also, it really does great, much better than I expected! It is a Alsons 6553110BX 1.6 GPM Fluidics Water Saving Showerhead. I have ordered a dual mode 2.5 GPM / 1.8 GPM showerhead to try, and I will update here when it is installed. It is the Alsons 6573110BX Adjustable 1.85/2.5 GPM Fluidics Water Saving Shower Head. I ordered both of these from Amazon.